Popular Posts

Showing posts with label wedding. Show all posts

May 8, 2016

Wedding Gifts Shadow Box


Wedding Gift 


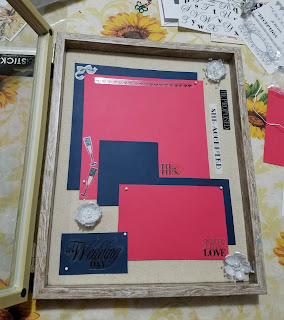
Marriage is a beautiful thing! One of my dear friends got married this year and I really wanted her to have something hand made. I just didn't know what to make her! I really like making things for people. It's nice to know someone put in some thought when creating a gift for you. However, without knowing her house themes and colors, I didn't want to make something that she couldn't use year around or just in one room. So I decided on her wedding colors and a shadow box for wedding pictures. 


I've really wanted to make my husband and I one and just hadn't gotten around to it. This was my chance to play with ideas. Her colors were navy blue, coral and silver. When shopping everything silver looked more gray then anything, so I decided to just have the small flowers representing the lighter color. I like the idea of the coral color popping out while the navy served more as a border or background color. You'll though that there is a small block of navy in the middle so it's not entirely pink taking over the theme. I chose a light colored shadow box frame because I felt it would mesh well with any room she may put it in and also let the colors inside of all the eye attention. While creating the shadow box and moving things around I realized she probably would have other ideas or tastes, so everything is pinned in and removable.  
Supplies:

     Shadow Box / Frame


       Cardstock Paper


Stickers / Decorative Detail


      Extra Embellishments / Flowers


      Pins


Shadow boxes are extremely easy to make and fun. The only time consuming thing about them is how long it takes you to decide on what you want where! But they are quick and very unique to any occasion for keepsake memories. Some ideas for shadow boxes could be; My Baby's Firsts, School Projects, Soccer or Sport Memories, Prom Night, First Date Night, Movie Night (save all movie tickets), Honeymoon, ext. The sky is the limit when it comes to your memories and how they can shy in a shadow box. With depth you can have shells or even the golf ball that won the championship. Hope you got some great ideas! I'd love to hear them! Leave some of your ideas in the comments.

Have a Sweeter Day than Yesterday!  

March 15, 2015

Crochet Wire Necklace Tutorial

My bestie is getting married! Super excited for her, however, I won't be able to make the wedding. So my gift for her is a necklace to wear for her wedding as well as necklaces for her bridesmaids. I'm super excited to make them for her but it would have been nice to be there.   

Below are the steps I took to make the brides necklace. First thing you definitely need to know how to do is crochet a chain stitch, click here for a video tutorial. Also I will pride a list of supplies.  


1) Start by stringing the beads directly onto the spool of wire.
2) Before starting leave a really long tail, I left about 6 inches.
3) Begin your necklace by chaining several times. This will be the back of your necklace. 

4) To add the beads, move the bead up to the, yarn over the wire over your hook, then pull through just like a normal chain stitch. You can add the beads anyway you like. The necklace will be beautifully unique. 

5) When you are finished with the beads & coming to the end chain several times.
6) Remember to leave a decent length tail before cutting.
7) Make as many stands as you want. I usually make 3 strands. 

8) Gather all strands at the end and twist.
9) Braid or twist the strands all the way to the ends.
10) Use your wire tails to add the clasps or length. 

Supplies:


  • 24 or 22 gauge wire  
  • Beads   
  • Needle nose pliers 
  • Wire cutters 
  • Metal crochet hook (plastic will end up getting ruined from wire

I hope this necklace inspires you to be creative with your gift making. Because the best gifts are those that are made with love. It's just fine to buy someone something. But for that person to know you took the time to create something just for them? Don't know about you but that sounds pretty meaningful to me. 


~~~~

Have a Sweeter Day 
Than 
Yesterday

February 23, 2015

Glass Etched Mason Jar - Wedding Center Piece


Do it yourself crafts for everyday decor is pretty popular. I have always liked to make things myself, rather than spend top dollar for something brand new.

My wedding was no different. My husband and I were going through a financial slump around the time we were planning our wedding. But due to a waiting period of six years we were just ready to get the marriage over with. Both of us had lost a grandparent, him a year before and me a month before the wedding. We didn't want to wait till we had enough money for the perfect wedding, but no one able to fly or drive to be there for our special day. So we found the cheapest place that looked decent, bought a wedding dress on the sale rack, and looked into youtube for "how to" tutorials

At the time I didn't know what I was going to do for center pieces. I kind of wanted mirrors with candles laying on top but was a little nervous of little hands wanting to play with them or starting a fire. Then one of my bridesmaids called me and said she was at a yard sale and she found 12 mason for a dollar. It was a no brainer, 12 mason jars for a dollar or glass mirrors $5.00 each. I told her to grab them and I would figure it out. Most brides have the perfect wedding already all planned out. I was lucky enough to have no idea and tons of crafty ideas to decide from. I was ready for cheap and compromise, compromise. 

So I didn't want to spend the money on ribbon or lace because that can add up as well. I do glass etching in my free time and already owned Armour Etch Cream. Once I found sticker I wanted as my stencil I was in business. I found them at Walmart for $1.00 a pack. So a total of $12.00. Also I wanted more than just the mason jar sitting in the middle of a large table, I wanted a candle on the inside so my guests could see the leaf shape so I found candles at the dollar store. 10 tea lights for $1.00. Grabbed 4 packs just in case and then I needed to get to work. 

Step 1: Wash the Jars surface of all dirt or smudges. 

Step 2: Place the stickers on the jar in the arrangement that you want.

Step 3: Apply the etching cream on the surface areas you wish to frost/etch. Be sure to not let the cream touch your skin! The cream has chemicals in it that burn the glass surface, which means it's going to burn your skin. I like to wear rubber yellow gloves when I work with the cream. 

Step 4: Let the cream sit on the surface for 1 minute. 

Step 5: Wash off the cream and peel the stickers off the jar and wash well if it's on something you will be drinking or eating from. 

For a video tutorial [click here]

So after all the jars were done I still wanted some some added width because the mason jar clearly had height but on such a large table, not enough width. So I found Silk Leaves to place on the table. It added color and width to the table. The final touch? My aunt asked me what I was going to do with the screw on lids from the mason jars. I told her nothing, I didn't think I was going to use them at all. My aunt suggested I spray them with Glitter Blast Spray Paint . My uncle sprayed them and I loved the added detail.  

So here is the finished product:


Supplies:


I hope this gave you some inspiration and some ideas for your future Do it Yourself projects.

~~~

Have a Sweeter Day Than Yesterday

January 18, 2015

Crochet Wired Jewelry

So one of my many hobbies is jewelry making. I love designing things and giving the things I make as gifts. I would really like to sell my hand made creations. My ideal dream would be to have a craft store that I would teach classes in.

One of my top favorite things to make is my crochet wired necklaces. They are super easy to make.
This is a bracelet and necklace set I crocheted for my wedding. The wire is gauge 24 and the pearls are just glass beads from Hobby Lobby or on Amazon. I added glass crystals  last minute for some sparkle. I think they turned out elegant. The necklace took about 2 hours to make and the bracelet was only maybe half an hour.

Crochet Wired Jewelry

Bracelet

Necklace and Bracelet